Cosworth front, and rear disc brake conversion:
Anyone who has owned a S1
Turbo for more than 2 days, will appreciate how difficult they are to stop at
the best of times.... When everything isn't working perfectly, then you add some
performance mods, it's always a bit of a lottery to know what to expect when you
press the brake pedal.. ![]()
One of the favourite and probably easiest brake mod available, is Cosworth front calipers and discs, with a rear disc conversion, again utilising Cosworth components, with the option of slightly smaller rear discs (253mm) from the mainstream Sierra - this is the route taken here, as without resorting to brake biasing valves etc., the cossie (273mm) rear disc can be a bit too much for the Escorts, making them a bit tail happy under heavy braking.
Front:
What you need:
4x4 Cosworth front calipers and pads, 2wd Cosworth front discs, 1mm spacer washers.
Cosworth Sapphire 4x4 (or Escort Cosworth) front calipers and 2wd discs are pretty much a bolt-on replacement for the standard items; the discs fit straight on the hub with no modification, the caliper carrier fixings line up with the hub, just requiring a spacer washer between caliper and hub to centralise the caliper over the disc, approximately 1mm spacer is generally close enough. The original bolts fix the carrier to the hub upright. Make sure the hub mounting face is scrupulously clean before the disc goes on - it needs to be shiny metal with all traces of rust removed.
Some people claim that they needed to grind material from the inside of the caliper carrier, or reduce the disc diameter slightly, to stop the disc binding on the caliper, but these went straight on, no hassle. As you see in the pics, these got shot blasted and powder coated - I can imagine that the rust and crud that builds up on the carrier and calipers could be enough to reduce clearance, these were pretty crusty when they arrived....
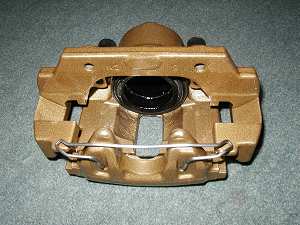
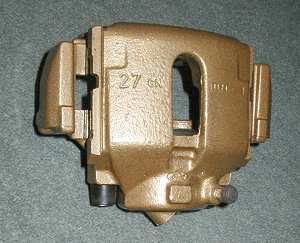
4x4 Front calipers - shot blasted and powder coated:
Rear:
What you need:
2wd Sierra/Granada rear calipers, 4-stud discs and pads. Caliper mounting brackets (to match the chosen disc size) and fitting bolts. Mk5/6 RS2000 handbrake cable. Longer flexible brake hoses.
2wd Cosworth rear calipers and discs are pressed into service on the rear. All Sierra/Granada rear calipers are actually the same, the only variations being 4x4 Cosworth Sapphire/Escort Cosworth/late Scorpio which used vented discs - the vented disc setup can also be used, but are much harder to come by and consequently much more expensive - in reality on a car of this weight, they really aren't necessary.
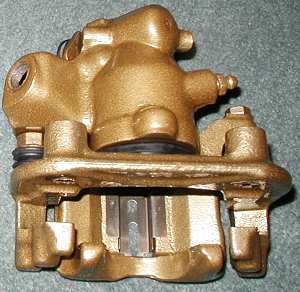
Rear calipers, shot blasted and powder coated:
The whole drum, hub and backplate assembly needs to be removed to expose the suspension upright - clean the face of all traces of rust in preparation for mounting the caliper mounting bracket...
We decided to get our own caliper mounting brackets laser cut from our own CAD drawings, for not much more than the going rate to buy one pair, we had a few made, and a bit thicker than the usual ones at 10mm
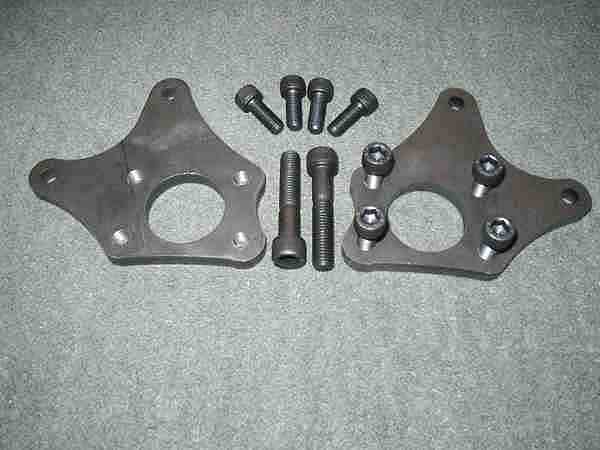
The fixing holes on the brackets are threaded to take the M10 high tensile caphead bolts - the existing threads in the uprights that previously held the drum backplates on need to be drilled out with clearance for the bolts (we made them 11mm to allow a touch of 'adjustment' ) - this is surprisingly difficult, as the uprights are made of some tough material, a good quality drill or three is required to get through this.
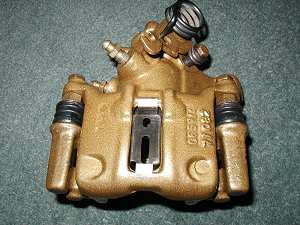
Bolted on the brackets look like this:
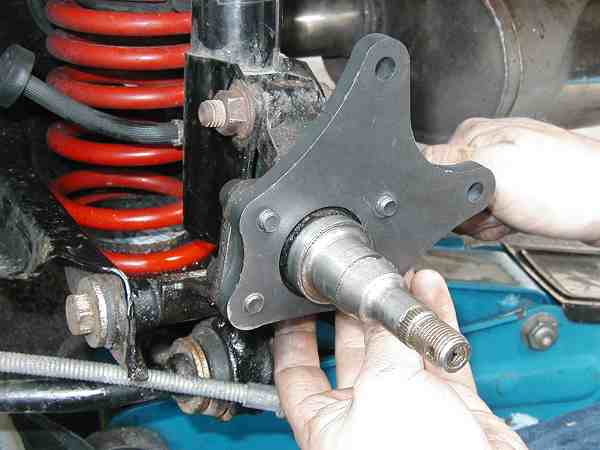
The bottom strut pinch bolt needs to be replaced with a M12x60 caphead to ensure adequate clearance for the bottom braket fixings - the original hex head is too big and interferes.
Replace the hub/bearing assembly, making sure again that the hub face is completely clean.
Fit the rear disc over the hub, secure with a couple of wheel bolts, and bolt the caliper carrier onto the bracket over the disc. Again a spacer washer will be required between the caliper and bracket to centralise the caliper over the disk, 1.5-2mm is about right. Use the original bolts if they are long enough, or get some suitable high tensile M10 bolts. Attach the caliper with brake pads over the disc onto the carrier.
Using a MK5/6 RS2000 handbrake cable, attach the ends to the handbrake levers. NOTE!! if you use second-hand calipers, it is imperative to ensure that the handbrake levers are not seized, and rotate freely, returning naturally to the stop - if this isn't the case, it WILL cause grief later and the self-adjusting mechanism in the calipers won't work properly, also making the handbrake operation poor.
Longer flexible brake hoses will be required to reach from the chassis mounting directly to the calipers.
Because the calipers aren't mounted right on top of the hub like they are on the Sierra, you may have fun and games bleeding all the air out - it may be necessary to loosen the caliper-to-carrier bolts, remove one completely and pivot the caliper so it is horizontal to aid bleeding, then bolt back on when finished.
With the 4x4 fronts and rear disc conversion, the brake balance should be about right, if the limiting valves in the rear circuit are operating correctly, the rear brakes shouldn't suffer from locking under hard braking.
For more detailed accounts and excellent pictures, you might like to have a read through Clint's accounts of these conversions: